Showing posts with label Pinterest. Show all posts

Saturday, October 5, 2013

Cinnamon Apple Cake

via
If you have a Pinterest account and are remotely interested in food, you've probably seen this pin. It has gone totally viral the past few weeks. So I thought, it's apple season, this pin is popular, I might as well try it out, right? Right. It was pretty delicious. Unfortunately, I left mine in the pan a little too long and it broke apart instead of being beautiful like the original photo above (from the original website). But it still tasted delicious! Also: I think it's pretty safe to say I use a lot of cinnamon.. Today my mom bought Cinnamon at Sam's Club, which means it's a ginormous container. When I asked why she bought so much she informed me that I've used an entire little container of cinnamon ever month for the past four months. Some things you just have to buy in bulk!
 If you don't have one of these, you should invest at once. They're amazing. Especially at Thanksgiving when you're making apple pie and apple crisp and apple cider etc, etc, etc. It literally takes 10 seconds to peel and core your apples this way. 

 You'll need 5 medium size apples for this recipe, peeled, cored, and diced. Cover them with the cinnamon and sugar and set overnight. I didn't read the recipe before starting, so I didn't really want to wait overnight to make the cake. If that's the case with you as well, you can do it the cheater way like me.. I just spread them in the bottom of a 9x13 pan and baked them at the lowest setting of my oven for about 10-15 minutes. The purpose of them sitting out was to allow the sugar to break down the apples a little to make them extra juicy, and so baking them accomplishes a similar effect in less than half an hour.
Cinnamon Apple Cake (found here)

Combine and set overnight:
5 Medium Apples, peeled, cored, and diced
2 t Cinnamon
6 T Sugar

3 C Flour
3 t Baking Powder
1/4 t Salt
2 C Sugar
1 C Vegetable Oil
1/2 C Orange Juice
2 1/2 t Vanilla
4 Eggs

Topping:
1 Stick Butter
2 t Cinnamon
5 t Sugar

Preheat your oven to 350 degrees. Mix the dry ingredients, minus the sugar, together. Mix the wet ingredients, plus the sugar, together. (keeping the apples separate). Combine the two until well mixed. Layer the apples and cake batter in a greased tube pan. Bake at 350 for 1 1/2 hours. While it is baking heat the topping over medium heat in a small saucepan until bubbling. Set aside. When the cake has finished baking pour the topping over it and leave it in the warm oven for 5 minutes. This will form a hard sugary coating that is totally delicious. Enjoy!
post signature

Friday, October 4, 2013

Chocolate Peanut Butter Trifle

This is seriously the most delicious thing you will ever eat. For seriousness. And it's so easy. I made it a while ago to bring to a friend's house for dinner and it was enjoyed by everyone :)
 The layers are composed of brownies, whipped cream, a sweet peanut butter mixture, pudding, and Reese's.

 I kept forgetting the layers while I was at the store and I couldn't get the recipe back because I had terrible service, so I just guessed on what flavor pudding. I guessed vanilla, but it was supposed to be chocolate so I  just added cocoa to the vanilla mix and it worked out just fine.

It's so pretty layered too! 

Chocolate Peanut Butter Trifle (found here)
1 Box Brownies, baked according to the box directions
1 5 oz box Chocolate Pudding, prepared and Chilled
2 C Heavy Cream
1 C Creamy Peanut Butter
1 C Powdered Sugar
2 T Milk
8 T Cream Cheese

Beat the heavy cream in an electric mixer until stiff peaks form. Transfer to a medium bowl and chill. In the bowl the cream was whipped in mix the peanut butter and cream cheese together until well combined. Add the powdered sugar and milk. Fold 1 C of the whipped cream into the peanut butter mixture until it is a lighter color and mostly combined. Layer however you like and enjoy!
post signature

Monday, September 30, 2013

Apple Cinnamon Cupcakes with Caramel Icing

These cupcakes are incredible. There's no other way to describe them. SO GOOD. The best apple flavored food you'll ever eat. I'm not even exaggerating. For reals. I made them the other day for a church dinner and they were a huge hit! I found them on Pinterest, but the recipe was on the picture and didn't connect to a blog so I'll just copy the recipe here.


Apple Cinnamon Cupcakes with Caramel Icing
1 C Flour
1 t Baking Soda
1/2 t Salt
1 t Cinnamon
1/2 t Nutmeg
Pinch of Cloves
1 C Sugar
1 Egg
1/4 C Oil
2 C Peeled and Sliced Apples

Icing
1/2 Stick Butter
1/2 C Brown Sugar
1/4 C Heavy Cream
1 t Vanilla

Makes 12 cupcakes. Preheat oven to 350. Mix together all the dry ingredients. In a separate bowl cream together sugar, egg, and oil. Mix the wet and dry ingredients until just combined. Add the apples and mix thoroughly. The batter will be really thick, so you'll want to mix the apples so they let off some of their juice. Scoop into baking cups and bake at 350 for 30 minutes. While the cupcakes are baking prepare the icing. In a small saucepan melt the butter and heavy cream on medium heat. Add the brown sugar and bowl for 5 minutes. Remove from heat and add vanilla. Let cool. Drizzle over cooled cupcakes and enjoy! 

P.S. This is my 150th post! Crazy, right??

post signature

Saturday, September 7, 2013

It's Just Lunch

 So I definitely thought that this week's "It's Just Lunch" was going to be a dud. But luckily for me, it wasn't! They were absolutely delicious! Way better than bagels you would get from the store, and way less expensive! I was originally going to make these bagels for breakfast this morning and post them separately from "It's Just Lunch," but then I realized I still didn't have a post for this week so I'd better post these! And it worked out because they weren't done until noon anyway! If you do decide to make them, I would suggest starting the dough the night before, because it has to rise a while. 
 The one on the left was sprinkled with poppyseeds.
 This one was flavored with basil and oregano.
 The one in the middle is flavored with minced onion and garlic.

Whole Wheat Bagels (found here)
2 t Active Dry Yeast
2 t Sugar
1 1/2 C Warm Water
3 1/2 C Flour (I used 1 1/2 C white flour and 2 C wheat flour)
1 1/2 t Salt
Toppings: coarse salt, onion and garlic, poppyseeds, cinnamon sugar, rosemary and thyme, oregano and garlic, basically whatever you want! Experiment with your favorite spices or keep it simple with plain bagels

Sprinkle the yeast and sugar over 1/2 C warm water, but do not stir. Let sit for 5 minutes until frothy. While that is sitting mix the flour and salt in a stand mixer with the bread hook attachment. You can also do it in a large bowl with a spatula if you don't have a bread hook (but if you make a lot of bread they're definitely worth the investment). Make a well in the middle of the flour and pour in the yeast mixture and another 1/2 C warm water. Mix together until moist and dense. Add the other 1/2 C warm water 1 T at a time, just until all the flour is incorporated and the dough is slightly moist. Knead by hand for 10 minutes. Put the dough in a lightly oiled bowl and place a damp tea towel over it. Let it raise for 1 hour or until doubled in size. The best place for bread to rise is somewhere warm, so I just put mine in the oven at the lowest heat (mine only goes down to 170 degrees) with a small bowl of water under it. After the dough has doubled in size punch it down and let it rise an additional 15 minutes. Preheat your oven to 430 degrees and put a large pot of water on the stove to boil. Take out the dough and separate it into 8 equal parts. Mold your dough into discs by pressing them down on the counter. Poke a hole through the middle and stretch the hole out until it's about 1/3 the size of the bagel. (this isn't as hard as it sounds, just make it into a bagel shape) When your water is boiling float as many bagels will fit in the pot. Boil them for 1-2 minutes on each side (the longer you boil them the chewier they will be). After they have boiled you can add any toppings you like. If you want to add bigger spices or minced onion I would suggest adding it to an egg wash so it doesn't fall off when you bake it. Bake at 430 for 20 minutes. Enjoy!

post signature

Saturday, August 31, 2013

It's Just Lunch

This weeks It's Just Lunch is SUPER easy! I've been wanting to try making cornbread in the waffle maker for a while now, but we've never had chili for me to put on it until now. We made chili for our church's dinner and had a little left over for me to use. 
 It was really easy to make, because we had a cornbread mix that I used for the cornbread. If you are looking for a recipe, this recipe looks delicious! I just mixed up the mix, stuck it in the waffle iron, and waited for the light to go off. Then I microwaved the leftover chili, topped with cheese and had lunch! Delicious and easy :)

post signature

Wednesday, August 28, 2013

Record Bowl

This is literally the easiest thing you will ever do. It takes less than five minutes. Seriously the thing that took the longest was fining a record I was willing to melt. I had to go buy on because I like all mine too much! 
 So preheat your oven to 350 degrees. Place your record over an oven proof bowl and place it in the oven. It melts REALLY fast so keep an eye on it! As soon as it starts to soften take it out and push it into the bowl, bending the edges in the design you want. It will be hot, so make sure to use tongs or something to do the pushing!

 Let it cool and use it for your favorite snack! Unless that's dip.. that probably wouldn't be the best idea ;)


post signature

Tuesday, August 27, 2013

Breaking Bottles

So I'm sure most of you have seen the pin about cutting bottles with string and fire. I've been wanting to try this one for a while, and I decided this past Sunday was the perfect day. I had been saving these bottles for about a month for such a time as this.
 I washed the labels off with warm water and got everything set up. I bring it all outside when I hit my first pitfall. My mother was sitting outside and she kind of freaked out about the fact that I was lighting bottles on fire on her front porch... After it was OK'd by dad (with the condition that I wear safety goggles) I was back on my way. 
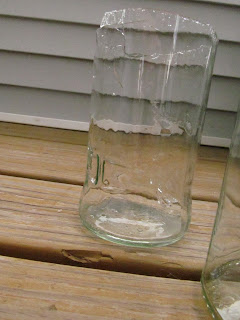
Although the bottle says extremely flammable, I had a really hard time getting the string to light on fire. No biggy, I just switched to rubbing alcohol and that lit up just fine. I let the flame burn for about 30 seconds before I dunked it in the ice water pot. It cracked almost all the way around, and I just had to knock the top against the pot a few times before the whole top broke off. It's not a perfect straight line, but I think that adds character.

 The next one was a little more eventful. I soaked the string, wrapped it 6 times around the bottle, lit it on fire, and let it go. It all seemed to be going perfectly! 

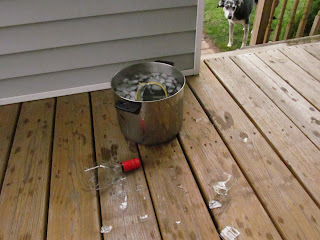
 This picture was supposed to be of the fire, but you couldn't see it. It was burning though! I think I let it burn a little too long though, because when I dunked it in the ice water, well you can just see...


 It shattered...

 Good thing I was wearing safety glasses (aka, the biggest sunglasses I own...)
 The bottom was still pretty much in tact, so I was able to just sand the top smooth and make it work! 
 I chose to use dry black beans for the filling because my bathroom colors are black white and pink. 
 I really like the way it turned out!

post signature
Related Posts Plugin for WordPress, Blogger...